LIN4SCRAPPIN

Monday, December 6, 2010

CCC #53

Here is my entry for the contest. It's my first entry to anything like this. Hope everyone likes it! I've decided that I will then use this as a white elephant gift exchange gift for work. I figured it's way better to give something useful than junk, and I can't find anything else to bring!
Please post comments! I'd love some feedback since I'm new to all of this!
I used Gypsy Wanderings and Cardstock from DCWV Winter/Christmas Combo and Recollections cardstock.It is a set of 4 3X3 cards, with lined envelopes and a coordinating gift box.

Thanks for reading!!!
-Lindsey F

Monday, November 29, 2010

My Christmas Cards!

Guess who got her Gypsy this week??!?!?!?! ME!!!
I'm so happy I love this thing! My husband decided it was time for an early Xmas gift since I was wasting so much paper with the Winter Frolic Cartridge. We also will be making wall decor for the baby's room with Create a Critter so I will be getting on that project soon too! He's due in March so I have a little bit of time, but not much!

Now for today I will be sharing one of my Christmas cards I made with the Gypsy and Winter Frolic.

I used pre-made card bases I bought at Michaels in a 50 pack with envelopes.  I used white but they come in many colors.
I cut a cardstock mat the same size (6 1/2 X 5) in a solid color
I cut two different coordinating cardstock strips at 6 1/4x 2 1/4
Where the two meet I placed a piece of ribbon across the card
I cut my characters on my cricut expression using my gypsy and Winter Frolic Cartridge at 2 1/2 inches.
I first tried 3 1/2 but they were HUGE. I think 2 1/2 or if you prefer a bit larger try 3 inches.

I glued my characters and added some doodling, googly eyes (at 2 1/2 inches the eyes are WAY too small to cut) and stickles. I was lucky enough to snag the christmas stickles when I could - my local scrapbook store can't keep Xmas Red in stock! Thank goodness Michaels carries it!
For the Mouse card, I didn't yet own a cute stamp so I printed the sentiment at 16 using Bradley ITC and Bold in navy blue. I then had to hand cut the words and hand cut the navy blue matting.  The paper for both cards is the Winter collection from DCWV. I can't cut my characters with the textured DCWV to save my life, and if anyone has a suggestion I'd appreciate it, so far it's not working! SO the characters are a mix of Bazzill Basics (love at first cut) and Recollections solid cardstock.
I used my pink atg gun to adhere everything except for the characters... I used foam dots to raise them from the card to add dimension.
Thanks for reading! Hope you enjoy the cards as much as I enjoyed making them!

-Lindsey F

Monday, November 22, 2010

Got my cricut back update

I got my cricut back a while ago and have been doing some catching up.Even though it sucked that my cricut died right in the middle of my halloween project, but I ended up with a new cricut mat and plantin schoolbook and accent essentials cartridges. So alls well that ends well.
I started designing some Christmas cards,gift cards,and a cute little gift for my co-workers.I believe it will all be done using the Winter Frolic Cartridge. As soon as I get some pictures of my projects I will post them. I'm currently waiting for my Gypsy to come in the mail! I ordered it on the Back Friday sale at cricutmachine.com and still haven't gotten it yet!!!! So as soon as I do I will have more to post.

Tuesday, October 26, 2010

Major Cricut Bummer

So OMG my cricut chirped for the last time in the middle of my project! I've only had it for a month and it died! I'm working it out with provocraft, but so far the dead cricut is still on my table since I have no return mailing label yet! I'm devistated! I had the cutest project and I can't finish it in time for Halloween and all that money is down the tubes.
Once it is fixed I will be back with more projects but until then...... *sigh* I will just have to figure something else out. I do want to start making paper bag albums, but my cricut would be wonderufl for those too!!!!!!

Thanks for reading.... I'll be back soon and hopefully with a fully functioning cricut.

Monday, October 25, 2010

Halloween Treats No Trick required!

Hi everyone! Today I will be working on my Halloween candybar wrappers! Pictures will be posted later tonight. I love my cricut and my Mini Monsters Cartridge is so far my favorite! I recently went back home to Arizona for a wedding and brought some card making supplies and introduced my mom and sister to the cricut! I made The cards from my previous post and premade a kit for them to make some with me while we were there! It was fun! Now I am making candybar wrappers for my co-workers and a few friends!
I've been tirelessly cutting with the cricut yesterday and today to get all my monsters cut! I'm still new at this so I'm still figuring out sizing and the best types of cardstock for the cricut ( I've discovered a new love for Bazzill Basics for cutting in the cricut just FYI)
I purchased a box of Hersey's milk chocolate (36 count) at Costco and will be wrapping them and blinging them out!
I measured and the first layer of the wrapper should be 5 1/2 inches by 6 inches. It will overlap on the back.
The second layer is 2 1/2 inches by 5 1/2/ inches.
I used a patterned paper for te 1st layer and a solid coordinating paper for the second.
Once I have all my monsters cut, glued and decorated I will add them with a pop dot/ foam adhesive to the second layer. You can then add ribbon anywhere you want. You may also want to add ribbon first then your monster. It's all up to you!
So I will post the photos  this evening when I am hopefully caught up on this project!

Thanks for reading!
-Lindsey

Sunday, October 10, 2010

3 more Cricut Mini Monsters Cards!

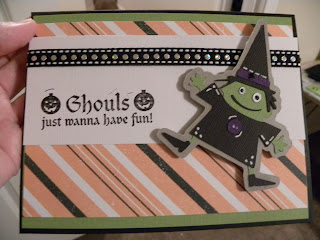
As promised, here are the other 3 cards I made at my first go at card making! Leave comments below!

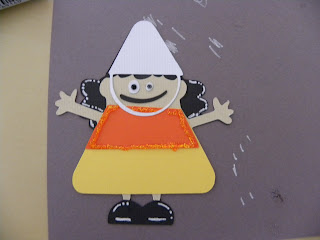
Hi Everyone! I'm so excited to share my very first completed card project using my cricut expression! I just got it last month, and I received my Mini Monsters Cartridge on Friday! I couldn't wait to get it just for this cute Candy Corn girl! Isn't she just so cute?!?!
So I'm going to try my hand at a "tutorial" of how to make this card. I'll also post the other 3 I made after this one, all using the same techniques and measurments as this one! Here we go......


You will need the following items to make the card:
1.Cricut Mini Monsters Cartridge and the Cricut Expression
2.Black cards with envelopes ( mine is 6 1/2 x 5) or you can make yours with black cardstock
3.Orange cardstock cut to 6 1/4 X4 3/4
4. Candy Corn partterned paper ( Martha Stewart Halloween paper pack) cut at 6 X 4 1/2
5. Yellow cardstock cut at 6 X 2 1/2
6. Ribbon ( I bought mine at Michaels... it's just orange)
7. White get pen for doodling
8. Ghouls just wanna have fun stamp ($1 bin at Michaels) with black stamp pad
9. I also used orange and black stickles to embelish.
10. The Candy Corn girl was cut at 3 1/2 inches on the cricut expression with grey (base shadow) ,beige(layer 1),yellow(shift layer 1), orange(shift layer 2), black(icon), and white(layer 2) cardstock
First I glued my candy corn cardstock to the orange mat ( see sizing above).

Then adhere the ribbon to the yellow card stock strip. Add the yellow strip and ribbon to the candy corn patterned paper. I left a row of candy corns along the bottom edge and placed the yellow just above that.

Just stamp the sentiment in the bottom right corner!
Glue the Candy Corn girl layers together to make the cutest lil monster around!

I doodled with the gel pen on the black areas, outlined the orange corn pience with orange peel stickles,and black stickles for the eyes. Then add some pop dts/dimentionals to the lil cutie and add at an angle to the left side of the card!
And TADA! Super cute card! At least I think it is! I'm quite proud of my first card project! Let me know what you think in the comments!

I'll make another post with my other 3 I made for this set!
Thanks for reading!